Community Page
On this page you can see contributions from the growing Aware IM community. Feel free to share your application or a plug-in. Click on the button below to submit your own contribution.
Posted by Pete Bradstreet on 08 Mar 2013 9:30 am
The AwareIM Toolkit is a stand-alone application (bsv file) that provides several highly useful features that can be added to any AwareIM business space to extend the functionality of your application, it also makes an ideal starting point when developing a new application.
View details at http://www.awareim-toolkit.com
Cheers, Pete
Posted by Carlos Castillo on 01 Nov 2012 4:10 am
DONT FORGET TO SHARE YOUR AwareIM stuff!!!
Follow the steps. Really easy to create
https://www.awareim.com/phpBB2/viewtopic.php?t=5672&sid=780826850f3e9cc0b17e65167435edcb
LineaMovil // Carlos Castillo
AwareIM Version 5.5 (have 6 applications running)
Windows Server 2008 SR2
MySQL Database (XAMPP)
Skype: lineamovil
www.lineacero.net
MEXICO
Hi everyone,
We have completed a new theme specifically written for our application , LaserQuote. For those interested feel free to download and change it as you see fit.
Version 5.2 (starting with build 1513) now supports a query displaying items NOT in a reference list already.
This BSV demonstrates the concept:
https://www.awareim.com/community/Not_Query_Demo.bsv
1 ) The rule to for the query to show instances NOT selected (the top query) is:
FIND Customer WHERE COUNT RegularUser WHERE (RegularUser=LoggedInRegularUser AND Customer IN RegularUser.SelectedCustomers)=0 ORDER BY Customer.Name
2 ) Through using Auto Refresh capabilities of the 2 queries, items move “real time” between the selected and not selected lists.
3 ) When combined, these features mitigate the limitation that queries can only apply a process on items selected on one page. While that limitation still is true, the dynamic nature of selecting & moving instances to a selected items query provides some relief.
4 ) Once items are moved to a selected items area, a process can easily be applied to all of the selected items.
To see this BSV in action:
5 ) Click “add new customer” and add some. I suggest adding more than 5 so they continue to page 2 of the query.
6 ) In the top query, click “Select” for some individual instances & watch them be removed from the top query & added to the bottom query
7 ) Now do the same for multiple instances at one time.
8 ) In the bottom query, clicking “flag selected customers” and “unflag selected customers” shows that a process can be applied to all selected items. Not that these processes will apply across ALL pages of the bottom query.
9 ) Click in the top menu bar “review selected customers”. This shows one other way of viewing the Customers stored in LoggedInRegularUser BO.
10 ) Click in the top menu bar “remove all selected customers” to more all items back from the bottom query to the top query.
There is a new Silver Blue theme available at the following location.
https://www.awareim.com/community/Themes/SilverBlue.zip
This theme is a variation on Silver Cherry theme. All of the areas that would have been red where changed to a blue color (HTML #003868).
To install the theme:
1. Extract the contents of the zip file
2. Place the xtheme-silverBlue.css file in the following directory
‘C:/AwareIM/Tomcat/webapps/AwareIM/ext20/resources/css’
3. Copy the silverBlue folder to the following directory
‘C:/AwareIM/Tomcat/webapps/AwareIM/ext20/resources/images’
4. Modify the file theme.props located in the C:/AwareIM/bin directory to add the new theme-specific entry
ThemeSilverBlue=Silver Blue;ext20/resources/css/xtheme-silverBlue.css
Posted by Bryan on 10 Dec 2009 3:23 pm
There is a new Silver Green theme available at the following location.
https://www.awareim.com/community/Themes/xtheme-silverGreen.zip
This theme is a variation on Silver Cherry theme. All of the areas that would have been red where changed to a deep forest green color.
I have a few ideas for additional themes with more variation but I would love to hear your ideas for theme colors.
Posted by aware_support on 13 Oct 2009 5:35 am
A lot of people are asking how to use web services exposed by 3rd parties (Microsoft, Google and other service providers).
This BSV contains an example of a consuming a YouTube web service:
https://www.awareim.com/community/ServiceExample.bsv.bin
Note an intelligent object YouTube that represents the YouTube site. It has a service with a custom reply defined. The service has been discovered by Aware IM automatically. The StartMessage process uses this service and saves the reply in the YouTubeReply object
This BSV will demonstrate:
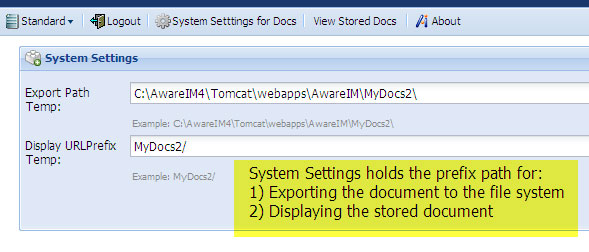
1) Exporting a document to the file system
2) Tracking the exported file name / path
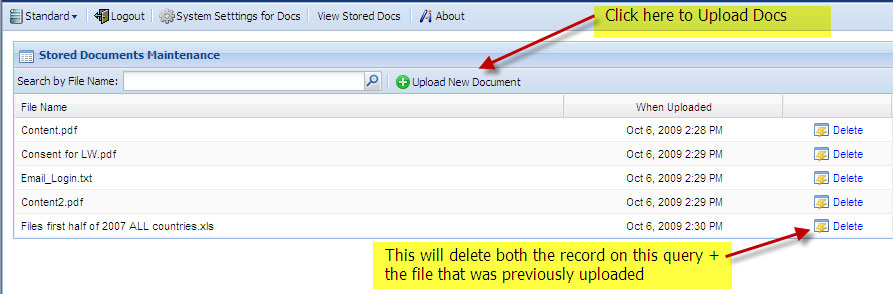
3) Ability to delete a tracked file from the file system
4) Display the document using
….a) DISPLAY URL
….b) HTML link on Form
Download BSV here
Remove .bin extension after download
1) When you first run the BSV, click “System Settings for Docs”. Default values for folders will appear as follows:
2) Upload Documents. Note that the target folder will be automatically created by AwareIM if it does not exist.
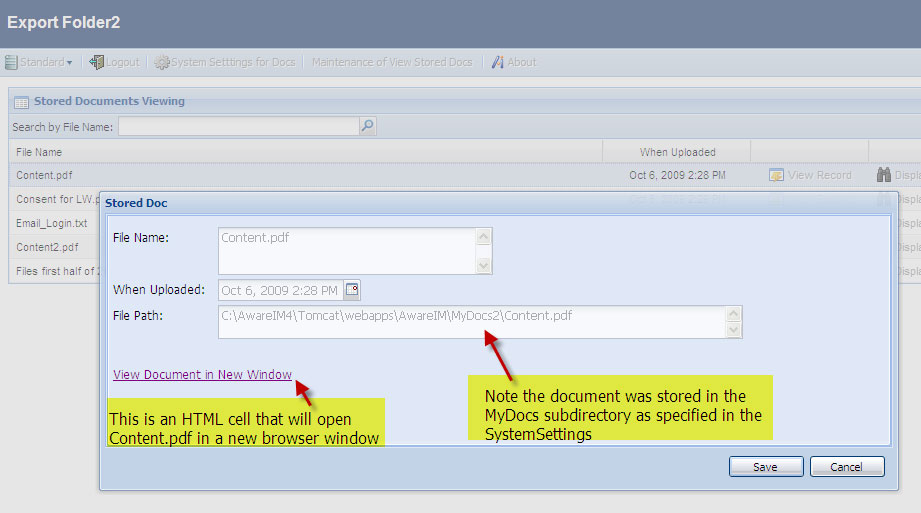
3) When you click “View Stored Docs”, this Visual Perspective appears:
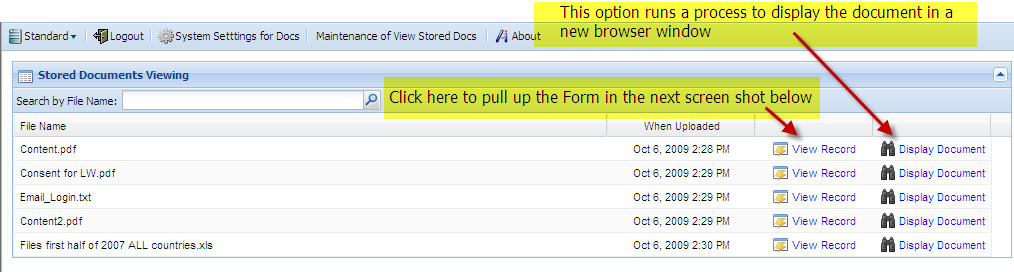
4) This Form is show how a stored document can be opened via HTML cell link.
Posted by Tom Ford on 07 Jul 2009 09:03 pm
I’ve got a sample BSV demonstrating the following:
1) Entering 5 attributes for a client
2) Showing 3 selected Client attributes on a query
3) Click on an operation that allows user to Query by Form to select which clients they want to export to CSV
4) User is presented with Query by Form selection parameters screen
5) User is presented with screen to view the CSV (ie: Excel) of all 5 attributes of the selected clients.
This becomes more useful when you want to give the user a large number of attributes per client in the CSV/Excel file (not just 5 per the above example). In a situation like this the Export button on a Query would not be practical because you would have to show the large # of attributes on the query for AwareIM to export them.
Additionally if you running AwareIM on a hosted server, the EXPORT action is not practical either, because it would export the file to the server & not the client machine.
This BSV solves both of these limitations.
This BSV is available here: Download BSV
Please remove the .bin extension after download.
To run this BSV:
1) Create a sub-directory: C:\AFileStorage . If you want to use a different directory, change it in the Process “FindAndExport”
2) Click “Add New Client” and create a few. Use the same City on a few of them so that you can demonstrate the Query by Form gathering process in #3.
3) Click “Select Clients for Export to CSV”. Choose a City with more than one record. After clicking OK, you will see the result below the query
4) When you click on the icon, SelectedClients.csv will open up
Posted by Tom Ford on 5 Oct 2009 6:23 pm
This BSV demonstrates how to use HTML cell of a Form to put a Custom Banner in AwareIM’s Banner frame. AwareIM attributes can easily be placed in the banner also.
Download BSV:Here
Remove .bin extension after download
Example of Custom Banner below shows:
1) logo (AwareIM used in this case)
2) System Name that can be easily changed
3) User name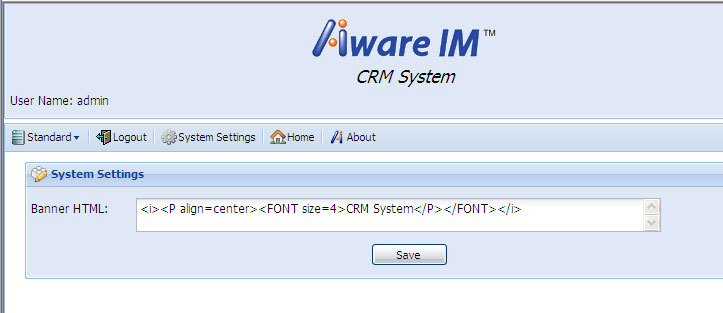
This shows the SystemSettings form called “Top Banner”. It includes a HTML cell whith the 3 different types of elements mentioned above.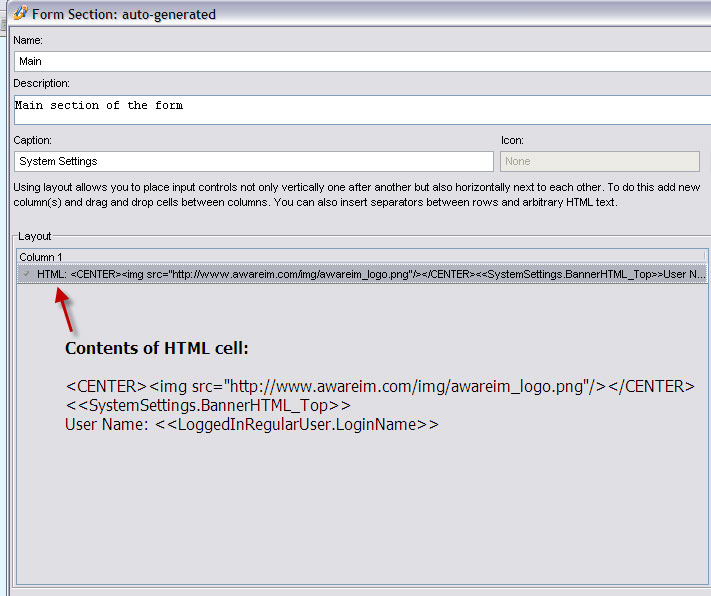
To Run the Sample BSV:
1) When you run the BSV you will get a message that a BO is unresolved. Cancel this message & click on System Setttings.
Here you can enter HTML that will be used as the System Name.
2) Click Home and you will see the System Name from #1 above show up in the banner.
3) You can also use the configuration tool to modify the hard coded HTML in the “Top Banner” form.
Download sample BSV here
Remove .bin extension after download
This BSV is not “pretty”, but it demonstrates a few concepts.
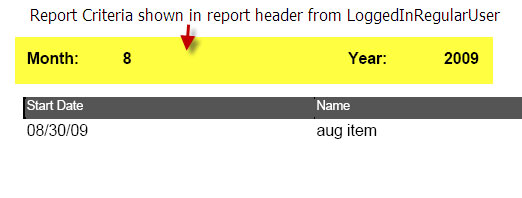
1) Report criteria stored in LoggedInRegularUser
“Report” menu option runs process “PickTimePeriod_ShowReport”. This uses the RegularUser form “Report Criteria” to gather & store the report criteria. In this example, the critera from the last time the report was run are the default.

2) Values collected in Step #1 above are used in the Report’s Title band
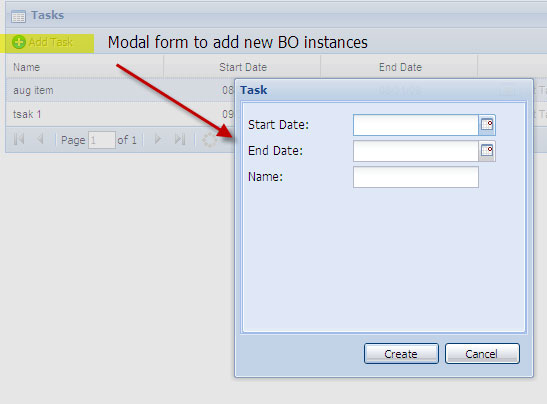
3) Modal ADD form appears by using a process: EditTask
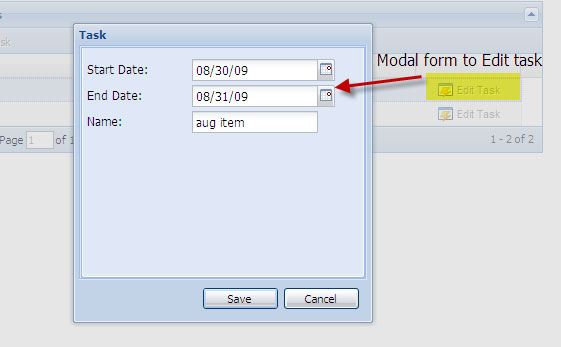
4) Modal EDIT form appears by using a process: NewTask
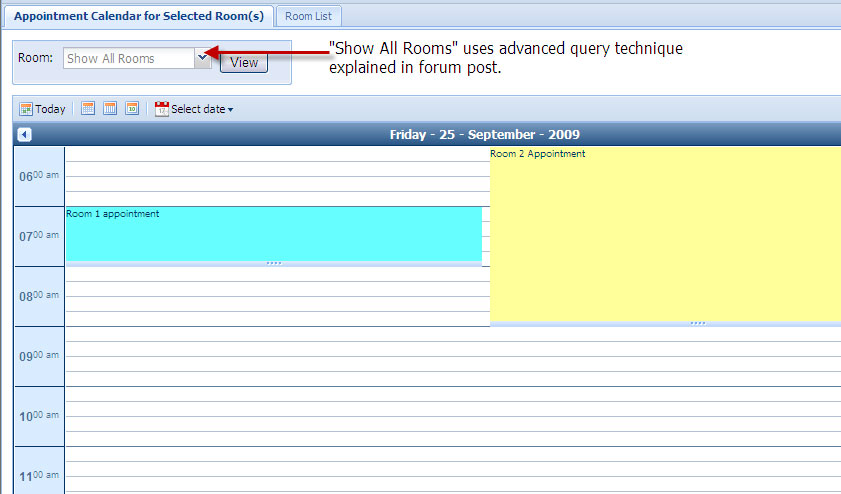
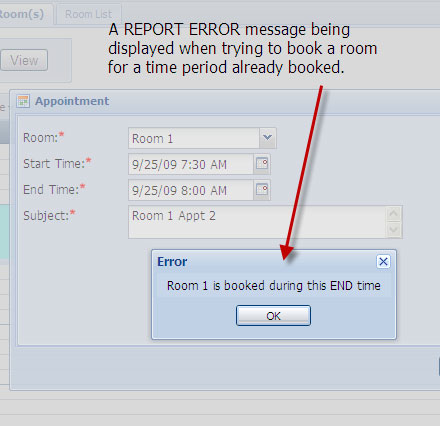
This BSV demonstrates:
1) Advanced Search ability explained at https://www.awareim.com/phpBB2/viewtopic.php?t=1548
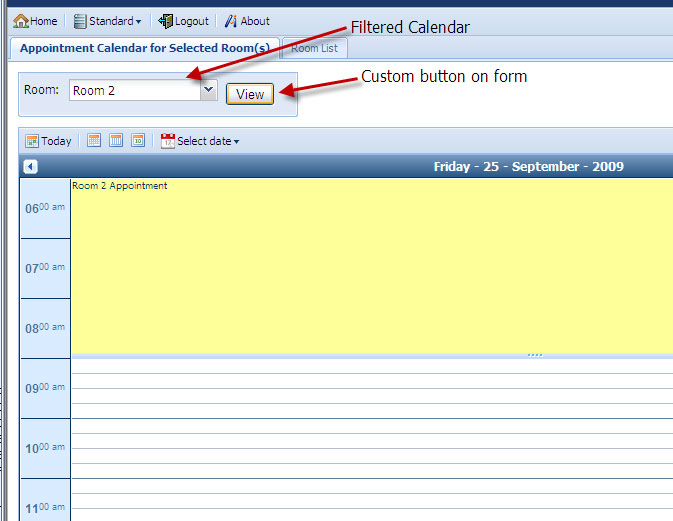
2) Custom button – also explained at https://www.awareim.com/phpBB2/viewtopic.php?t=3005
3) How to ensure that new appointments do not conflict with existing appointments.
Download BSV: here.
Remove BIN extension after download
#1 Advanced Search — uses:
FIND Appointment WHERE Appointment.Room.RoomName=LoggedInRegularUser.Room.RoomName OR LoggedInRegularUser.RoomExclude=’Yes’ ORDER BY Appointment.RoomName,Appointment.StartTime
#2 Custom Button — RegularUser form “Room Filter” uses:
Note that the saving of the RegularUser form triggers the refresh of the query “Appointment Calendar for Selected Room” because RegularUser is listed in the Auto Refresh triggers.
#3 – Conflicting appointments eliminated:
Three rules in Appointment BO ensure that new appointments for a particular room do NOT overlap with existing appointments.
This sample BSV demonstrates how to:
1) Have a form to filter choices in a reference list (see screen shot below):
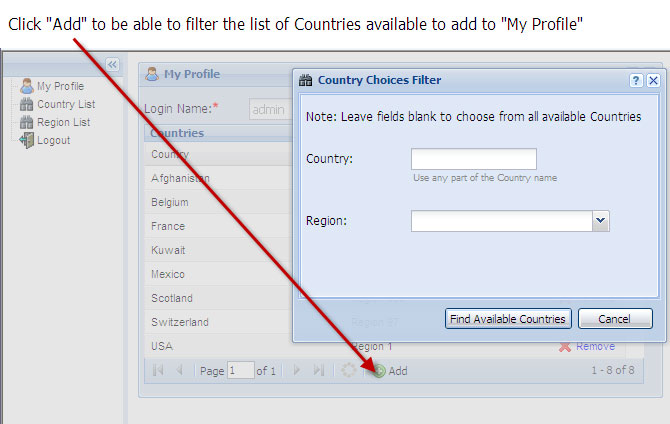
2) Show only instances NOT currently on the reference list:
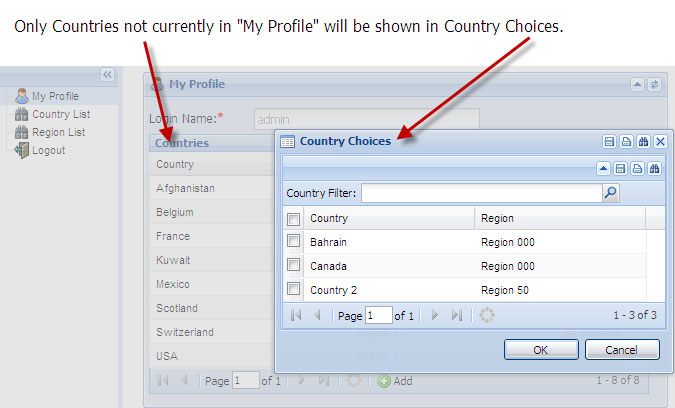
The key is the query: “Country Choices List”. The query’s FIND action is modeled after the workaround shown in the User Guide — Appendix B #14:
FIND Country WHERE COUNT RegularUser WHERE (RegularUser IN Country.Users AND RegularUser=ThisRegularUser)=0 ORDER BY Country.Name
Note that this query uses the form “Country Choices Filter”. This form produces the “Country Choices Filter” in the first screen shot above.
Download Sample BSV: Add_Country_Filter_8_31_2009.bsv
After download, remove the .bin extension
Posted by Tom Ford on 25 Jun 2009 5:14 am
Concepts described in this post can be used in a number of different ways. The notes include learnings about AwareIM capabilities while using AwareIM data to create XML files to be used by the following tools:
Flash Calendar Pro http://www.usflashmap.com/products/flash_calendar/flash_calendar_pro.htm
Fusion Charts http://www.fusioncharts.com/
I will post more details about creating appropriate XML files for these two Flash / XML tools at a later date. The scope of this post will be to demonstrate some of the “building blocks” you will need to understand.
This BSV will show:
A- How to write HTML file to an AwareIM subdirectory using AwareIM data
B- Displaying the HTML files in various ways
1) iFrame displayed in a Form
2) iFrame displayed in a Query
3) using DISPLAY URL
Building Blocks BSV details:
1- Add System Settings attributes:
a) DisplayURLPrefix_Temp – Plain Text 150
b) ExportPath_Temp – Plain Text 150
2- Create BO name City with attributes:
a- Name – Plain Text
b- Country – Plain Text
c- HtmlExportPath – Plain Text 150 – Calculated
d- iFrame – Plain Text 200 – Calculated
3- Create Document: “HTML_Country” of Text Document type.
Contents of the document (just to show writing basic HTML with AwareIM data):
City: <>>
Country: <>
4- City BO rules:
a- City.iFrame=`
b- City.HtmlExportPath=SystemSettings.ExportPath_Temp+City.Name+’.htm’
c- EXPORT DOCUMENT HTML_Country TO FILE City.HtmlExportPath
5- Make a form for City BO: City iFrame
a- No Caption
b- No buttons
c- Only 1 attribute shown: An HTML cell with the value: <>
Click “Hide Label”
6- Create 3 processes. Each have City BO as Process Input:
a- “ShowUrl_NewTab”
DISPLAY URL SystemSettings.DisplayURLPrefix_Temp+City.Name+’.htm’ NEW TAB
b- “ShowUrl_NewWindow”
DISPLAY URL SystemSettings.DisplayURLPrefix_Temp+City.Name+’.htm’ IN NEW
c- “ViewCity_iFrame_Form”
VIEW City USING ‘City iFrame’
7- Create Query: “One City iFrame Query” on City BO
FIND City WHERE City.ID=ThisCity.ID
In “Display Results” dialog:
a) only display iFrame attribute. Make the column name “None”
Uncheck ALL boxes in the lower part of the screen… the “Other” box.
8- Create query “City List”
FIND ALL City
Show attributes: Name, Country
Show the following Operations next to each instance:
–> 3 Process from #6 above
–> Query from #7 above
9- Visual Perspective: Administrator
–> in Main frame, show the Query “City List”
Misc Notes:
10) You will need to create a subdirectory:
C:\AwareIM4\Tomcat\webapps\AwareIM\Temp
Note that as new builds are installed, this directory (and any files in in are deleted. You will need to copy them off and same them & replace them in the proper place after the new build installation.
11) when you run the BSV, initialize System Settings & set the following attributes:
ExportPath_Temp: C:\AwareIM4\Tomcat\webapps\AwareIM\Temp\
DisplayURLPrefix_Temp: Temp/
12- Running the BSV:
a- now, run a test
b- add a few instances of City BO
c- Click “Home” to redisplay the City List query
d- click on the various Operations to show various ways to use the HMTL that was generated by AwareIM using AwareIM data.
These concepts will be shown later to create XML files that will be consumed by the Fusion Chart SWFs and Flash Calendar Pro SWF.
Posted by Tom Ford on 25 Jun 2009 3:24 pm
This post expands on Exporting HTML files using Aware IM data and displaying same(#1)
It will demonstrate how to:
A) Generate HTML from >1 instance of a BO using a query
B) Use an attribute in SystemSettings BO to display iFrame
Add the following to the BSV referred to above:
1) Add attribute to SystemSettings: CityList_ALL_iFrame – Plain Text 150
2) Add attribute to City BO: CityLine – Plain Text 25
3) Add rule to City BO: City.CityLine=City.Name+’
’
4) Add Document (Text document type) named “HTML_City_ALL”:
This is a list of a Cities in AwareIM:
<>
5) Add rule to City BO:
EXPORT DOCUMENT HTML_City_ALL TO FILE SystemSettings.ExportPath_Temp+’City_List_ALL.htm’
6) Query: “City List ALL iFrame Query”
– SystemSettings BO
– Display Attribute: CityList_ALL_iFrame
—- Column Name=None
– turn off all checkboxes in the “Other” box.
7) Add a menu option to display Query from #6 above.
Now run the BSV:
8 ) Put following in System Settings – CityList_ALL_iFrame:
9) You will have to Edit each instance of City previously created to trigger the new City rules added above.
10) Now run the Query menu item created in #7 above.
You should see a list of all City instances displayed in the iFrame.
Summary:
You might be saying “What’s the big deal… I can do all of this with a Custom Presentation.”
Yes, that’s true. This example is intended to just show the building blocks for being able to create HTML and XML files using AwareIM data. I have intentionally not included XML logic to keep the examples focused on the AwareIM steps needed & not focused on the XML & HTML elements and formatting.
Posted by Tom Ford on 25 Jun 2009 8:00 pm
This builds on BSV built in two posts below:
Exporting HTML files using Aware IM data and displaying same(#1)
Exporting HTML files using Aware IM data and displaying same(#2)
This BSV demonstrates:
A) naming report files with AwareIM BO attributes in context
B) giving user the ability to save or email report with name from #1
C) eliminating extra messages / mouse clicks in report display
Steps:
1) Add a Report: OneCityReport . Determined at run time. Include City.Name and City.Country on the Detail Line.
2) Add process: ExportAndViewOneCityReport
PICK FROM ‘City List’ ORDER BY City.Name
EXPORT DOCUMENT OneCityReport TO FILE SystemSettings.ExportPath_Temp+’Report_300__City_’+City.Name+’.pdf’
DISPLAY URL SystemSettings.DisplayURLPrefix_Temp+’Report_300__City_’+City.Name+’.pdf’ IN NEW WINDOW
3) Add “One City Report” to the Menu. This will run process from #2 above.
Now run a test:
After clicking the menu option from #3 above, you will get a Pick list.
When you choose a city & click OK, the PDF report will open in a new screen. It can be saved or emailed with a name that includes the City the user selected.
Obviously you can use different syntax of DISPLAY URL depending on your needs.
